Personal Protective Equipment
The following instructions refer to adding a single PPE item. If you need to upload multiple devices at once, you can use the bulk import feature via .csv (Excel) file by clicking the “Import” button.
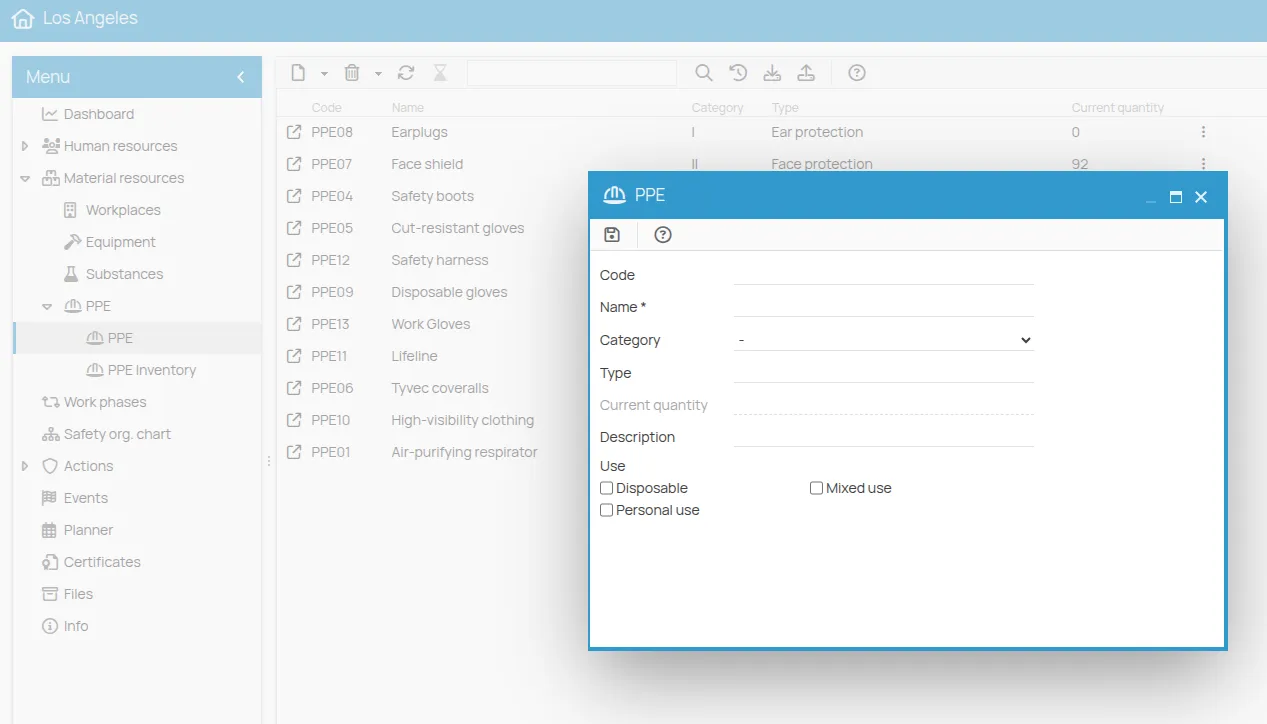
How to Add a Single PPE Item
Section titled “How to Add a Single PPE Item”- From the office menu, select PPE.
- Click the New button at the top left. You will then be asked to choose the insertion type for the PPE:
- Copy: Select this option to duplicate an existing PPE and modify it.
- New PPE: Choose this option to configure a PPE from scratch. In this example, we will proceed by adding a New PPE.
- Fill in the required fields: name, description, category, type, and intended use. Fields marked with a red asterisk are mandatory.
- Click Save to complete the insertion.
Inventory of an Existing PPE
Section titled “Inventory of an Existing PPE”If the PPE has already been added and you want to add it to the inventory to manage its specifics (quantity, expiration, etc.):
- From the menu, select PPE Inventory.
- Click New and then the “Select” button to find and choose the device you want to inventory.
- Enter the additional required data (such as quantity, expiration, etc.) and click Save.

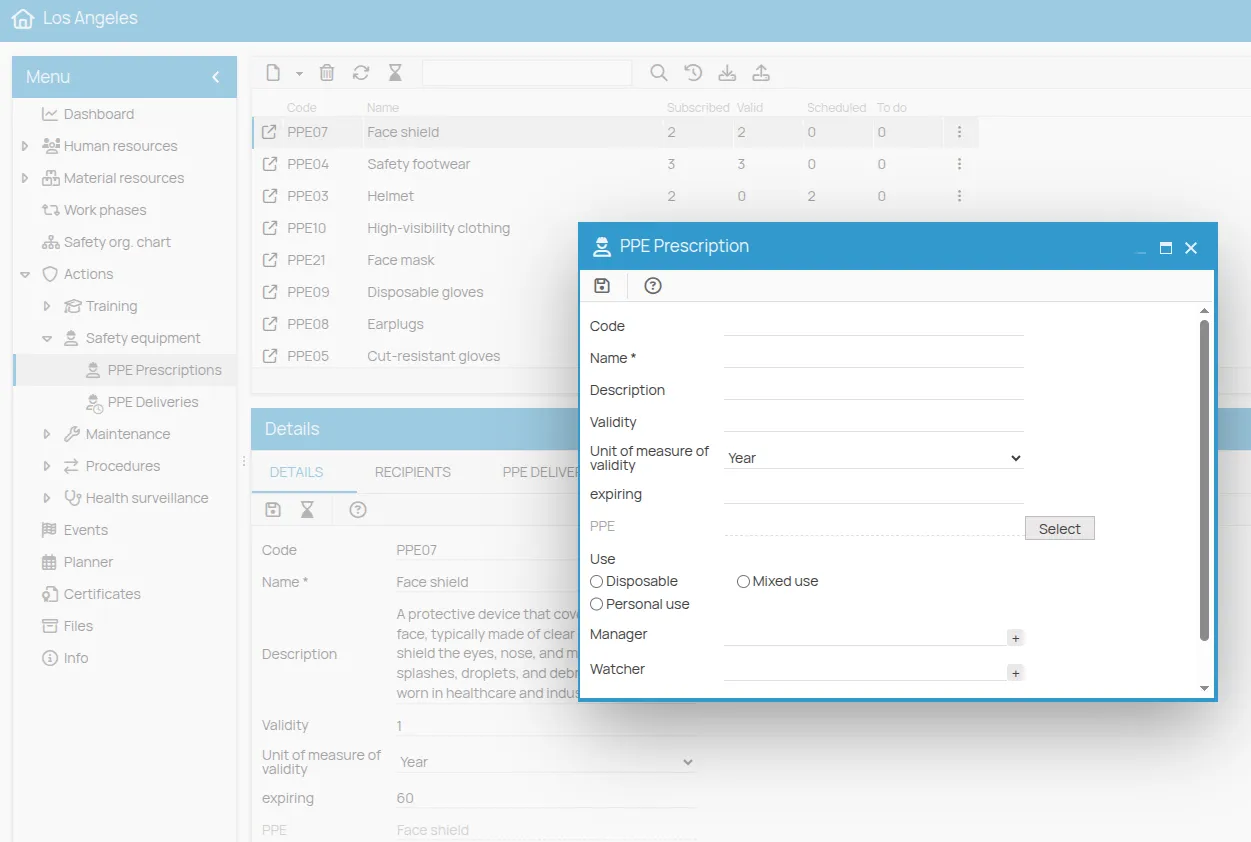
Determining Prescriptions
Section titled “Determining Prescriptions”Scrolling through the actions menu, locate the area dedicated to Personal Protection. The menu is divided into two sections:
- PPE Prescriptions
- PPE Deliveries
Prescriptions define which PPE will be assigned to workers, while deliveries correspond to the register of when the PPE was physically delivered, including the quantity handed out and the list of recipients.
Note: To determine Prescriptions, it is essential that the devices have been previously registered in the material resources.
Once the devices are registered in the material resources, you can proceed with configuring the Prescriptions:
- From the Actions menu, under Personal Protection, select PPE Prescriptions.
- Click the New icon. At this point, you can choose the insertion type for the allocation:
- New: Choose this option to create a completely new allocation.
- Copy from: Select this option to duplicate an existing PPE allocation and modify it. In this example, we will proceed with New.
- In the Name field, enter the name of the device to assign.
- Select the PPE from the list of available material resources by clicking on *Select.
- Click Save to complete the insertion.
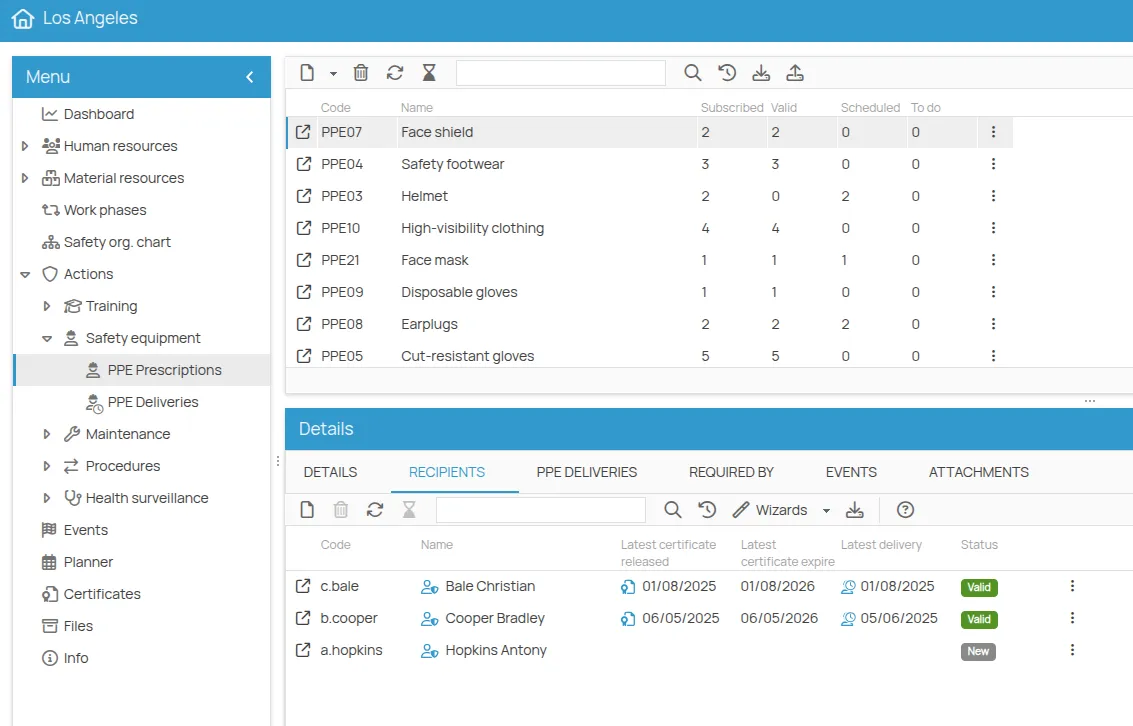
Assigning PPE Recipients
Section titled “Assigning PPE Recipients”- Select the row corresponding to the PPE name. At the bottom of the screen, the detail window will open automatically.
The first tab displays the previously entered information: here you can edit or add new data if necessary. The next tab, Recipients, allows managing the recipients of this PPE allocation.
- Click the New button to assign the PPE to people. A registration window will open where you can select the allocation recipients.
Recipients are added with one of the following statuses:
- New – PPE has not yet been delivered;
- Valid – PPE is currently valid;
- Expired – PPE has expired and needs replacement.
Associating Resources to the PPE
Section titled “Associating Resources to the PPE”The Requested by tab allows you to associate the PPE with contexts where the device’s use is required to mitigate a risk. Specifically, you can link:
- Tasks
- Roles
- Equipment
- Environments
- Substances
- Work phases
-
Select the item of interest and click Next. A complete list of available elements for association will be displayed. Select the desired ones and confirm by clicking Confirm.
-
Once the operation status shows Completed, click Finish to conclude.
The Requested by tab will then be populated with all the resources where the use of this PPE is required as a risk mitigation measure.
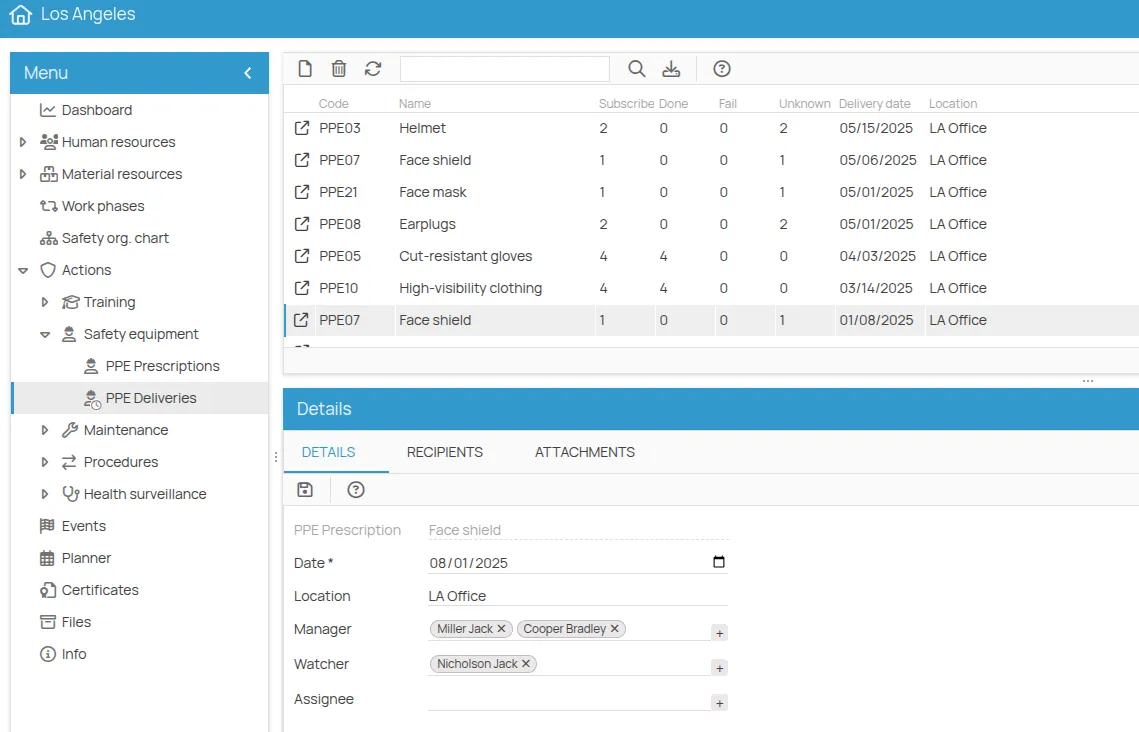
PPE Delivery
Section titled “PPE Delivery”1. Creating a Delivery
Section titled “1. Creating a Delivery”- Go to the PPE Deliveries menu and click New.
- Select the PPE allocation for which you want to register the delivery and click Save.
- Fill in the delivery details:
- Delivery date
- (Optional) Time slot and location
- Indicate the notification recipients:
- If recipients were already associated with the allocation, they will be proposed automatically.
- You can add others by clicking Add (+) and selecting people or roles from the organizational chart.
- After selection, click Save.
Clicking the created delivery row opens the Details menu at the bottom, showing all information related to the allocation and delivery.
2. Assigning Devices to People
Section titled “2. Assigning Devices to People”- Click New in the Recipients tab.
- All people previously associated with the allocation will be listed.
- Select the people to whom you want to deliver the PPE and click Save.
The initial status for each recipient will be To be completed.
3. Recording the Delivery Outcome
Section titled “3. Recording the Delivery Outcome”The delivery outcome can be recorded in two ways: single or bulk.
Single Mode
Section titled “Single Mode”- Click the icon or double-click on the person’s name to open the detail window.
- Select the delivery outcome (e.g.,
Passed, indicating successful delivery). - (Optional) Check the W (warning) box to highlight those needing attention.
- Edit, if necessary:
- Start validity date
- End validity date
- Associate the PPE with the inventory if the device is registered.
- Specify the quantity delivered. The default is 1, but you can modify it if needed. The delivered device quantity will automatically update the available quantity in the inventory once the delivery certificate is issued.
You can then proceed in two ways:
- Save to keep the option to modify data later.
- Or click the rosette icon to issue the delivery certificate.
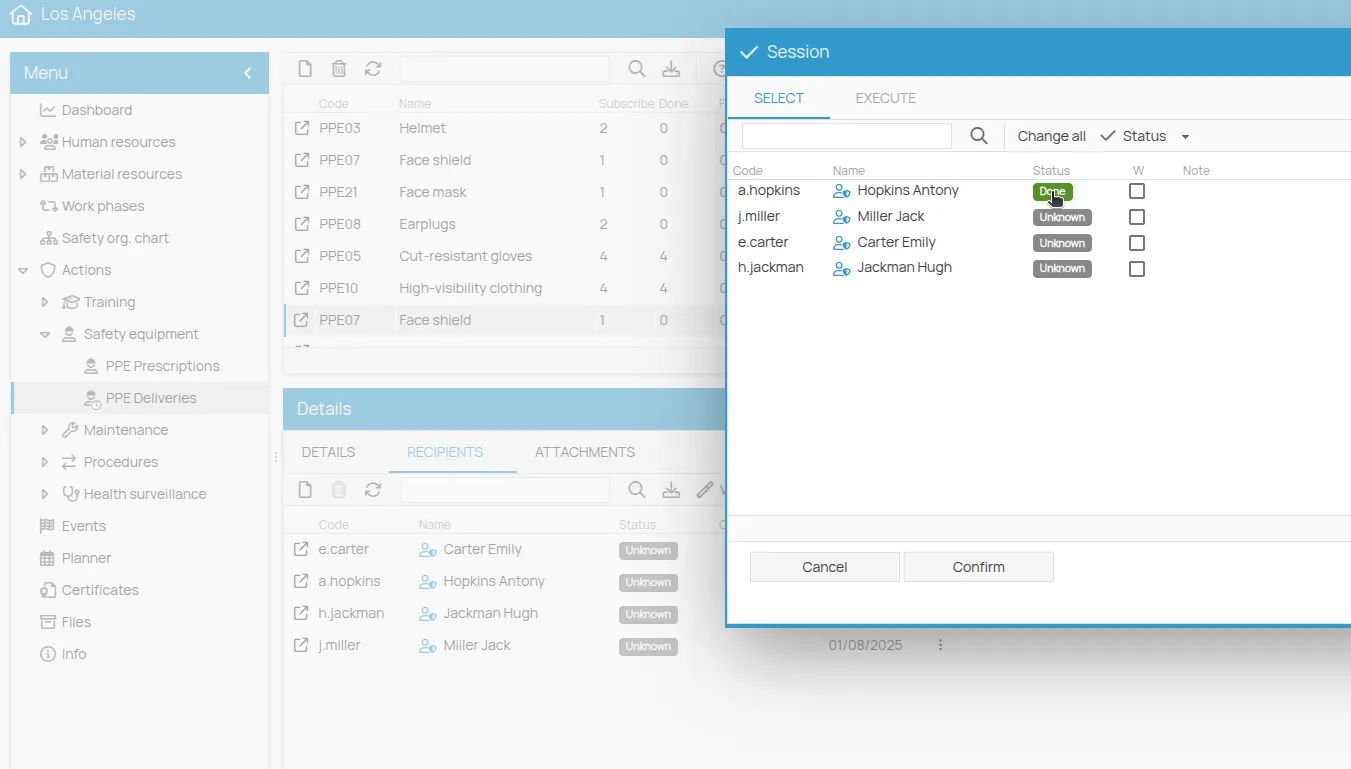
Bulk Mode
Section titled “Bulk Mode”- From the Recipients tab toolbar, click Guided procedures and select Bulk edit.
- The list of all recipients will be shown.
- Click the status badge to change it to
Passed(equivalent to delivered). - (Optional) Check the W (warning) box to highlight those needing attention.
- When finished, click Confirm to save all changes.
- In bulk mode, the number of devices delivered is always 1 per recipient.
From the guided procedures, you can also issue delivery certificates for all recipients who passed delivery using the Bulk certificate creation tool.
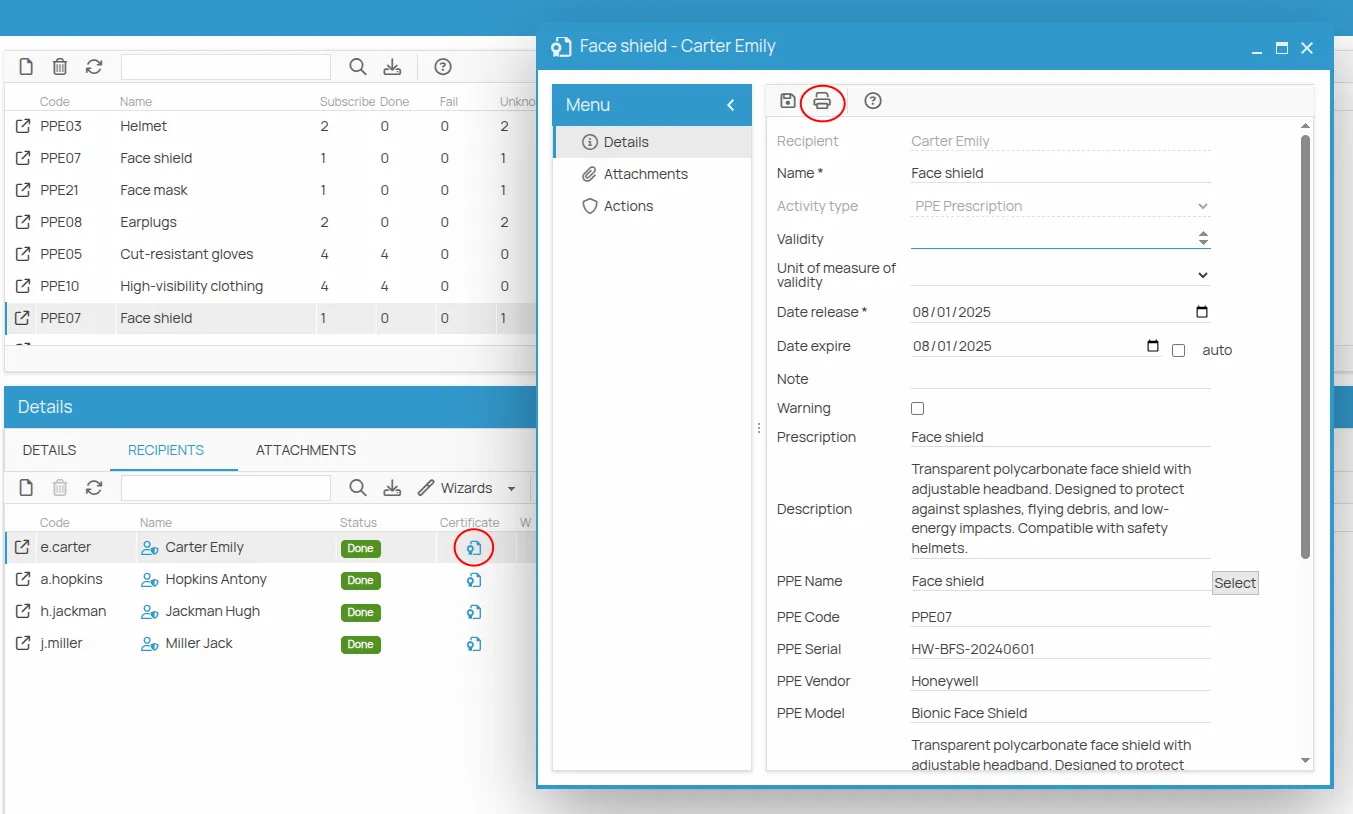
Printing the Delivery Certificate
Section titled “Printing the Delivery Certificate”To open the certificate printing tool, click the blue icon representing the certificate. A window will open allowing you to verify and edit, if necessary, the data to be included on the certificate. These include:
- Recipient’s name
- The action type, automatically associated with the PPE allocation
- The issue date, which can be modified or kept as previously entered
- The expiration date, automatically inherited from the inventory if the PPE is registered, or manually editable if not registered
-
Verify all data accuracy and proceed with printing the certificate by clicking the printer icon button.
-
Select the desired template and click Save. You can then choose to print the certificate or generate a file in PDF, HTML, or Word format.
-
Archive the document in the office folder or save it locally on your PC for personal management.